Apple Crisp
Apple Pie
Dutch topping, optional
Asparagus w/ melted Parmesan cheese
BBQ Baby Back Ribs, smoked
This is the only way I have found to make juicy, tender, and tasty baby-back ribs on the BBQ. To keep them moist the ribs are wrapped in foil halfway through the cooking process. Recipe adapted from a 2009 Labor Day weekend article in the Huffington Post and from the author.
Due to the source, I call these my Lib'ral Ribs. Cooking time: 3-4 hours.
Ingredients:
Start a small fire using natural hardwood charcoal. Avoid briquets of any type. Not only is natural charcoal easier to start, but it doesn't have the binding agents and god knows what else that holds briquets together. You don't want those binding agents "smoked" into the meat that you are going to eat. Also, do not use BBQ lighter fluid or softwood for smoke. If you do, you will taste it in your meat.
For St. Louis cut and spare ribs
For baby back ribs
Roast Beef, Prime Rib, BBQ
All the taste of Prime Rib on your home BBQ!
Prepare low-heat, slow-cooking BBQ for indirect cooking. Target temperature: 200-212 degrees.
Roast Beef, Prime Rib, Oven
All the taste of Prime Rib on your home BBQ!
Pulled pork, BBQ
This takes all day, but worth the time. Plan on 1.5 to 2.0 hours per pound of meat.
East Carolina BBQ Mop-Sauce Recipe: Kiss & Vinegar
Ribs are rich and fatty, and the best way to balance and cut the silky fatty mouthfeel is with acid. This is a simple vinegar based sauce, probably the oldest BBQ sauce in the nation, to cut the fat and enhance the flavor. The original was probably just a kiss of hot peppers and vinegar, and some cooks use only those two ingredients to this day.
Low Country vinegar sauce is used on naked meat, without a rub, and it does double duty as both a mop and a sauce. A mop is brushed on the meat while it cooks to cool it and flavor it. Because it is so thin, it penetrates deep.
For people like me who love vinegar and a bit of heat, this simple sauce is all you need on a properly smoked slab. Many of you will find it a bit severe and will want to use it as a mop in place of a rub, finishing the slab with a thicker, sweeter, more conventional sauce.
Best of all, this stuff keeps forever in the fridge, so make a gallon.
Recipe
Yield. Makes about 1 1/2 cups. Click here to calculate how much you need and for tips on saucing strategies.
Preparation time. About 30 minutes.
Ingredients
Do this
1) Pour all the ingredients into a jar and shake. Let it sit for at least 12 hours to allow the flavors to meld. A week is better. Mop it on the meat with this sauce with basting brush once every hour while cooking.
2) Take the remaining mop and boil it to sterilize it and give the meat one last splash before serving. To prevent contamination by uncooked meat, make sure to use a clean brush. Serve the sauce in a cruet on the side so your guests can drizzle more on if they wish.
source:
Stovetop Macaroni and Cheese
Thick and gooey and delicious -- super quick and easy. To make it easier, and more kid friendly, use 1/4-cup (2.2 oz) of cheese powder instead of starch and shredded cheese.
Ingredients:
Bring milk and butter to a boil
Baked Macaroni and Cheese
This space once listed an elaborate made-from-scratch Alton Brown recipe, but it's been replaced with this easy, and delicious, one:
Ingredients:
Instructions:
Remember to save leftovers for fried Macaroni and Cheese.
Baked potatoes "gratin dauphinois"
Preheat oven to 450 degrees
Serves two hearty appetites
source: Jeffrey Steingarten's "It must've been something I ate" pp. 168-170
Baked Shrimp and Potatoes
Makes 6 servings
Preheat oven to 400 degrees.
Notes:
source: Cooking up a storm / edited by Marcella Bienvenu & Judy Walker
BBQ Chicken
This simple recipe makes the juiciest BBQ chicken ever. Perhaps the most important ingredient is chicken thighs that are then
marinated, seared, and cooked using indirect heat.
If breasts, or other less desirable (and juicy) cuts are substituted you may need to adjust the cooking time
while being fully cognizant that the final product will be inferior to the dark-meated thighs.
Oven Baked BBQ Chicken
source: cooks.com
BBQ Rack of Lamb
Easy and yummy. Little prep, no marinating needed
BBQing fish
general rule: 10 minutes per inch of thickness
Use BBQ lid and don't turn ...
BBQ Sauce, southern style
An old-fashioned, slightly tart BBQ sauce that is a delightful change from modern, heavy, tomato-based sauces."
Bring the following ingredients to a boil in a saucepan. Boil for one minute before applying to the meat.
Idea: BBQ oven-baked chicken: Bake a dismembered chicken in this sauce for 90 minutes in 350-degree oven (60-min for two thighs).
Source: Reader's Digest Back to Basics book
BBQ Shrimp (not grilled)
The classic New Orleans dish has a misleading name there's no barbecue sauce involved but the rich, buttery sauce makes them addictive.
Ingredients
Peel the shrimp: Hold one shrimp with the head-end facing you and the tail end away from you. Insert the tip of small, clean kitchen scissors in the top 1/8-inch of the shrimp body and clip through the shell and the very top of the body down the shrimp's back to the tail. Pull the shell away from the body (it will come away in 2 pieces) and set it aside. Rinse the shrimp thoroughly under cool running water to remove the black and/or orange digestive tract. Repeat with the remaining shrimp. Pat the shrimp dry, toss with the pepper and salt, and set aside.
In a medium saucepan, heat 1 tablespoon of the oil over medium heat. Add the onion, and saut until translucent, 6 minutes. Add the shrimp shells and garlic and saut 45 seconds. Add the beer, Worcestershire sauce, peppercorns, lemon slice, oregano, pepper flakes, and bay leaf and 1/2 cup water, cover and bring to a simmer and cook for 10 minutes. Uncover and continue to simmer until reduced by half, 15 minutes. Strain the sauce through a mesh sieve into a bowl and then return it to the saucepan; set aside.
Heat the remaining tablespoon of oil in a large skillet over medium high heat. Cook half of the shrimp until they are just cooked through, about 3 minutes per side. Transfer shrimp to a large plate. Cook remaining shrimp the same way.
Bring the sauce in the saucepan to a bare simmer over medium heat. Add the shrimp and any accumulated juices and cook for 30 seconds. Remove the pan from the heat and add the butter in 3 additions, swirling to melt it before adding more. (Do not place the pan back over heat or the sauce will become oily instead of creamy.) Serve the shrimp and sauce over rice or creamy polenta sprinkled with the green onions.
Source: Oregonian: No Mess Nola Barbecue Shrimp, Published September 4, 2014
BBQ Vegetables in skillet
While the meat cooks on the grill using indirect heat, don't waste the heat.
Beef Strogonaff
Quick, easy and tasty.
Easy variation using ground meat (beef, turkey, pork)
Cook meat and vegetables in oiled skillet. Add other ingredients; serve over egg noodles.
Beer can chicken, slow cooked, smoked
If chicken always tasted this good I might even be forced to say I "like" chicken instead of "tastes
like chicken." The secret is in the brining and the slow-cooking.
Ingredients
Directions:
Beer Chile
source: by the Editors of Easy Home Cooking Magazine
source: Anne Chambers
Biscuits, Paula Deen's
Melt in your mouth Southern Style biscuits. Preheat oven to 425 degrees
Mix dry ingredients, cut in butter, then add milk. Knead, roll, cut, and bake for 10-12 minutes.
Cajun Blackened Fish
Bob's Holiday Rocky Road
Combine flour, sugar, baking soda, salt & oil.
Cream Cheese Frosting
Combine ingredients before gradually adding the sugar.
Baked cheesy chicken w/mushrooms & onions
Easy and delicious.
Chicken in wine sauce (aka Chicken Marsala)
This is adapted from a Cooking for Engineers Chicken Marsala recipe
Chowder, Baked for Fish, Clams or Mussels
This chowder can also be made on stovetop
Preheat oven to 375 degrees.
If making stovetop version, saute onions before adding everything else, except the potatoes and fish and/or seafood, which are preheated in the microwave prior to being added just before serving.
Variation by Teri: Leave out the mushroom, add frozen corn.
source: June Platt's New England Cookbook, c. 1971
Chowder, fast baked
Preheat oven to 500 degrees
Corn, Microwaved
General rule:
3 - 4 minutes per ear
(pre-soaked or placed under damp dishtowel)
Potato, Corn and Leek Chowder
Creamed corn, Cajun style
Forget the ready-made canned stuff. Make your own using fresh, frozen, or canned. Well worth the small amount of time and energy.
Directions:
In a skillet over medium heat, combine the corn, cream, salt, sugar, pepper and butter. Whisk together the milk and flour, and stir into the corn mixture. Cook stirring over medium heat until the mixture is thickened, and corn is cooked through. Remove from heat, and stir in the Parmesan cheese until melted. Serve hot.
This dish can also benefit from first frying the corn in the skillet with a little while in butter. You might also want to add jalapeno peppers and onions to the frying.
source: http://www.realcajunrecipes.com/recipe/creamed-corn/
Grilled Corn on the Cob
Cream of Broccoli Soup
A quick and yummy broccoli based soup.
Ingredients
Directions
Add broccoli and broth; bring to a boil. Reduce heat to medium; cover and cook until the broccoli is tender, about 12 minutes.
source: Eating Well, 157 calories & 10 oz. fat per cup
Creole Rice with Sausage
A delicious rice, sausage, vegetable skillet meal.
First, prepare the tomato sauce:
Prepare vegetables and sausage
Prepare rice
The sausage (already cooked)
Putting it all together
Eggs Benedict
Adapted from Joy of Cooking, revised edition, 1997. Serves two.
While this is going on, fry eggs, heat meat, and toast muffins
Enchiladas
note: Flour tortillas preferred as corn tortillas tend to dissolve when baked
Enciladas, shrimp
Shrimp with spicy tomatillo-and-cilantro sauce, a common combination in coastal Mexican cuisine, make bright-tasting enchiladas. Precooked shrimp help get them on your table in a hurry.
Makes 8 servings
NUTRITION INFORMATION: Per serving: 320 calories; 9 g fat (4 g sat, 1 g mono); 136 mg cholesterol; 37 g carbohydrate; 26 g protein; 7 g fiber; 538 mg sodium.
Nutrition bonus: Fiber (28% daily value), Vitamin C (25% dv), Calcium (20% dv), Iron (20% dv).
MAKE AHEAD TIP: Prepare through Step 3, cover and refrigerate for up to 1 day. Allow the cold baking dish to warm slightly before placing in a hot oven.
souce: Eating Well
An easy recipe that yields crispy chicken wihthout deep frying. Use this recipe to make your own sauce, or use store-bought.
Chicken ingredients:
Sauce ingredients:
Stir fry ingredients:
Instructions:
source: Omnivores' cookbook
Easy in-the-oven grilled sandwich using cast iron Pannini pan.
Pre-heat oven and pan to 350 degrees.
Note: the key to a great crab sandwich is to put what appears to be too much crab meat into the sandwich, but don't worry
about the height of the sandwich as the pannini pan will press it down when it cooks.
Can also be prepared on a stovetop grill or frying pan, but you'll need to figure out a way to press and flatten the sandwiches.
Marinated and Grilled Thick Pork Chops with Summer Squash
About 45 minutes before dinner, mix the marinade ingredients in a large bowl and add the chops,
Growler Cocktails, 64 oz.
Eggnog with rum
Hot Chocolate with Schnapps
Mint Julep
Moscow Mule with Gin
Guacamole
Pretty simple and quick!
In a size-appropriate bowl:
Serve with chips and margaritas.
Tor's Hard Cider
I've had enough people ask about a simple cider recipe that I'm just going to post it here. This recipe originates from my friend Tor, and is definitely not the finest of brews, but it's one heck of a strong cider. So-called "real" brewers may scoff at the idea of using bread yeast, but keep in mind that things work differently with cider than beer or wine, and don't knock it until you taste it.
Following one of those chilly days of outdoor adventure, throw away that store-bought mix as
this homemade -- and tasty! -- hot buttered rum recipe can't be beat and it only uses
common ingredients that are staples in any kitchen!
Basic and simple recipe. For creamier texture, whip in an egg. For ice cream maker, or freezer.
Combine all ingredients, stirring to dissolve sugar completely.
source: Taste of Home
Mushroom, Sausage & Spinach Lasagna
Lemon Cake
Meatballs, flavorful and juicy
Form meatballs to desired size, fry in oil until crisp
source: TV show: Munchies -- Dinnertime! with Matty Matheson
Mexican Pulled Pork
Directions
Montreal Steak Seasoning
Directions
French Onion Soup, crockpot
Easy with approximately 30 minutes prep time.
Onion-Lentil Soup
Pesto, basic
Pesto, shrimp
Pizza
Home-made Thin Crust Pizza -- after years of experimenting this is the best I have come up with. Source: Roberto's Cookbook ISBN 9780770433710
The Sauce: Use off-the-shelf spaghetti sauce as the base (Hunt's tradition recommended), or make your own. Either way, if you have the time, it is best to cook it down to add more body and flavor.
Porcupines, ground beef
Mix above ingredients; form into balls; place in baking pan.
Cover balls with mixture containing:
Bake covered for 45 minutes in 350-degree oven
Pork Tenderloin with savory apples
Pot Pies, aka Shepherd's Pie
A great way to make leftovers disappear! Can also be made with fresh ingredients.
Ingredients may include meat, green vegies, grilled onion, diced potatoes, celery, mushrooms, and carrots for color.
Let your imagination -- and your refrigerator -- be your guide.
**For sauce made without canned soup that can also be used over noodles and rice (sans potatoes):
Quesadillas, meat fillings
Spread a schmear of ketchup on one half of each tortilla, season with spices.
Ricky Burgers
Salmon, cold fried.
Brine salmon, minimum 15 minutes
Sauteed, or fried, fish
Dry rub fish with:
Then, add:
When butter begins to foam add:
Then fill in spaces with
Cook 4 minutes per side, nudging occasionally to keep from sticking to pan, less time for thinner fish.
Shrimp, basil and garlic
Make marinade with:
Pour over and marinate 10-15 minutes:
Garnish with:
Sautee until shrimp is done
Small Jewel Boxes of Prawns and Zucchini
Sloppy Joes, from scratch
More work than a can, but the flavor is so much better!
Use the above ingredients as a rough guide, or follow them strictly. Vary amounts to taste.
Easy Spanakopita
EASY SPANAKOPITA
Note from source: My children (who are very picky eaters) love this and always ask for it for all family holiday meals. I think this came from Good Housekeeping many years ago.
Preheat oven to 400 degrees F.
In 10 inch skillet over medium heat, in hot olive oil, cook green onions until tender, about 5 minutes. Spoon into large bowl.
Separate 1 egg, reserve egg white for glaze.
Into bowl, stir egg yolk, remaining eggs, spinach, cottage cheese, feta cheese, and 2 Tbsp chopped dill.
Unroll 1 can crescent rolls and separate into 2 large rectangles. Place in bottom of 13x9-inh baking pan. With fingers, press dough to cover bottom of pan, forming crust.
Bake crust 5 minutes.
Spread spinach filling evenly over crust. Unroll second can of dough and place on top of pie. With fingers stretch dough to cover filling completely, pinching perforations closed and pressing dough to edges of pan. Beat reserved egg white until frothy, brush over pie, sprinkle with remaining dill.
Bake 40 minutes, covering with foil halfway through baking if browning too quickly. Serve hot, or cover and refrigerate to serve cold later.
MSG URL: http://www.recipelink.com/msgid/3135664
Sphagetti, basic
This recipe given to me in what Grandma Keevil called that "awful house of hippies" in Ashland, Ore. by an old (or so I
thought at the time) small town, alcoholic country musican
who loved Johnny Cash's hymns and some dead skunk in the middle of the road-type guy from Portland;
Dan Hicks and the hot licks.
He insisted that the spices and the canned juices were the key; and after 30+ years of using
his recipe, I must heartily agree.
Basic ingredients:
Spicey artichoke & sausage pasta
A perfect workday dinner in just minutes (well, maybe 10s of minutes)
Spinach soup
Please do not underestimate this dish. I created it when I was looking for a quick meal to make from what was available from the pantry.
Whatever it lacks in gourmet appeal -- due to the use of canned spinch -- is quickly forgiven as
this quick an easy recipe really works as it produces a rich, creamy soup in the amount of time it takes to heat everything up
in a saucepan on the stove. While it is good when it comes fresh off the stove, for some reason it does not
age well and any leftovers should NOT be saved for another day, lest you begin a science project in your refrigerator. This may also qualify as a bachelor-only meal.
Asian stir fry
A quick dinner from basic pantry items
To a large frying pan, add:
Mix the sauce. To a small, one-cup bowl, add:
Serve over noodles or rice
Seafood stir fry with cream sauce over noodles
A quick dinner from basic pantry items
Into three separate pans, add one to each:
To each pan, add appropriate ingredient:
At the appropriate moment:
Cook until done
Seafood Stroganoff for scallops or shrimp
Quick, easy, and good while being somewhat light, depending upon how much butter and sour cream you add.
Put pasta water pot on stove to boil. To a dutch oven add olive oil, onion, and garlic. Slowly saute over medium-low heat.
As pasta approaches al dente status, boost heat on dutch oven to medium high and add sun-dried tomatoes, butter and beef (w/sauce), scallops, or shrimp.
Stir frequently until beef, shrimp or scallops approaches desired doneness.
Add spinach and sliced mushrooms and sour cream. Cover for a minute or two to steam spinach.
Blend in pasta and serve with grated parmesan cheese.
How To Cook A Steak In A Cast Iron Skillet
Stromboli
Try this easy Pizza alternative
Tomato-Corn Salad
Fresh corn is often so sweet and tender that there is no need to cook it. At the picnic, Hosmer and his team sometimes eat it right off the cobs they've just picked; he prefers this salad too.
Tortilla Soup, Ricky's
Puree cilantro, garlic, onion, chilies, and tomatoes in blender or food processor.
Heat stock and add pureed mixture & cumin/salt.
Bring to a boil, reduce heat and simmer about an hour. For thicker stock use more cornmeal or cornstarch - I used quite a bit more than this recipe called for today.
If using fresh tortillas you will need to cut them into strips and fry up - but chips are much easier.
Shred chicken and add to the finished product.
I find fryer chickens to be the best to get meat and broth but it takes half a day to boil one down... on top of getting out all the bones and such. But if you are doing that for the brother you might add some spices while it cooks down... for proper broth I believe you are actually supposed to cook down with celery and onions, but I dont feel you miss out on much when using it simply as a base... so I just use salt and pepper. Ive done the celery and such and thought it was just a waste of time and money and didnt taste a difference.
Serve over a handful of chips in a bowl and garnish with cheese or heavy cream, chopped fresh cilantro, and season with Tapatio or other hot sauce.
TRI-TIP BBQ, Grilled, whole
TURKEY TETRAZINNI
Cook pasta to al dente
Preheat oven to 375
Put spaghetti in the bottom of a greased 11xy baking dish
Top with turkey and green vegetable
Mix condensed soup with soft cheese, milk, and canned mushrooms until proper consistency is reached
Pour soup mix over everything and work mix into everything
Cover with breadcrumbs and hard cheese, grated
Season as desired
Bake for 30 minutes
Cast iron cookware
Fuel for Thought:
I read a Chicago Tribune food section piece many years ago on what frying pan you should get for your second frying pan. The theory was that you ve originally purchased (or received as a wedding present) a set of four or five pots and pans of a high-end set, and one of those would be your first frying pan. Your second frying pan would be for when you needed two on the stove, one was dirty, or when a recipe required metal with different cooking properties. For several reasons, the cast iron skillet got much play as a backup.
That s because the thing is durable--and its thickness spreads and retains heat very well, better than many pots and pans available on the market. Cast iron pans are dirt cheap, too: $20 for a high-sided skillet. $12 for a 10-inch skillet. About the same for an omelet pan. Sometimes just $10 for a griddle.
The problem--and this is why the things are so often stuck on the back burner--is that people seem to think that cast iron is high maintenance. There is a common list of complaints: The pans have to be seasoned, they can t be cleaned in the dishwasher, they have to be dried of moisture as soon as they are scrubbed, and they shouldn t be stacked when stored. Failure to comply usually means rust sets in, and ruins the pan unless all the stages of seasoning are repeated.
Yes, in concept, cast iron is fussy. But cast iron can be won over.
Love and Rust
First off, brand-new cast iron cookware is often cheaper than the used stuff, and there are many benefits to working with a fresh pan. More on that later. But if you already have cast iron cookware, or want to buy a used pan, here are things you should consider:
1. Warped bottoms. I don t know why it happens, if it is sudden or slow, or even if a well-nursed pan can avoid it, but the truth of cast iron vessels is that a lot of them have warped bottoms. When you find a used one, put it on a flat surface and push down on different points of the sides with the tips of your fingers. If it rocks back and forth at any point, there s obviously a lump, a fulcrum, or a bend in the bottom. That means that when it is on your burner only part of the bottom surface is getting full heat at any given moment. Your food will cook unevenly. This is especially a problem on electric stovetops. If you cook on a gas range, the flame reaches up to the pan, so the problem isn t as noticeable. But all the same, a non-warped bottom will still be a better and more consistent cooking surface for you.
2. Rust. Somehow dolts on this great earth think that if a cast iron pan has rust on it it must be old, and if its old, it must be an antique, and therefore it must be valuable. Usually the money a seller wants from you for this crusty rust puck is three or four times what a new pan would cost. When confronted with that choice, keep a few things in mind: It is hell to get off much more than a thin dusting of rust. Steel wool is the usual tool, and it can mean hours and hours of rubbing. You ll see few results and you ll get really sore fingers.
3. Value. Don t be fooled into thinking you have something of great monetary value if you have an older cast iron skillet, even if it s in great shape. I once contacted a private dealer of older cast iron pans looking for a specialty item--a plett pan, for making a crepe/pancake that s part of the traditional Thursday night supper in Sweden--and the dealer had two available, each to be sold in perfect and seasoned condition, and each of either 1950s or 1960s vintage. The cost for each: $36. Clearly not a fortune. (It isn t really such a special pan. Today it is usually called something like a silver-dollar pancake pan because of its shallow rounds.)
I find sellers at thrift stores, yard sales, and flea markets to be equally guilty of thinking that an old crusty nasty pan appreciates in value. If you see one and feel like giving rust removal a shot, offer 50 cents for one of these pans. If that offer is refused, tell the seller to see how much he/she likes scraping off rust. Why pay a lot just to have to apply your own elbow grease?
Better to buy a brand new pan. It will be cheaper, in more reliable physical shape, and shortly to be invested with the huge sentimental value that it is yours and yours alone. The pan becomes a reflection of your cooking habits only, whether you don t eat meat or you cook bacon every day. You ll shortly make it a silky black old-school cooking or serving dish and impress your friends on weekend mornings when they eat pancakes with you.
4. Sentimental value. For a long time I borrowed my mother s cast iron skillet. It was in great shape and obviously had years of the family s meal making on it, since its metal was so black and smooth that you couldn t not be drawn to touch it, like the shadow-less black fur of a midnight colored cat. Don t lose that, Mom said, it was your great grandmother s. Yeah, yeah, yeah, I said as I forgot the back story. When I moved I left it with my former roommate. Mom freaked. Had to have that pan or she d never look me in the eye again or something. So I got it back no problem. A few years later I borrowed it again and happened to have my grandmother over for dinner when she was visiting my town. Hey, I said in passing, this pan was your mother s, my mom tells me. To my surprise my grandmother almost choked up--she studied the pan with her eyes and spread her hands upright and wide beyond its sides, as if she were holding a beach ball between them where the pan was. Think of the meals made for me in this very pan when I was a little girl, she exclaimed. She was talking about the early 1920s. What has fed you is a part of you.
My mom has the pan again and I have no idea if it has a warped bottom from the eight decades of use by the family (and my former roommate), but that hardly matters. Any problem that pan offers is irrelevant to its meaning. If you ve got a pan like this in your family, do anything you can to use it. If it s crusty spend a few weekends cleaning it out. If it s hopelessly warped on the bottom use it for making gratins or anything else that s cooked in the oven.
Grindin
Let s say you already have an older pan. Here are some tips for cleaning it, and a big time restriction. Give it 45 minutes of hard cleaning time. The sad, sorry, stupid, busted, rotten fact is that if you ve got to clean the rust off your pan, there s truly no way to do it except with dirty fingertips and your broken fingernails. Don t read further if you re expecting a shortcut.
If the rust is only a matter of small spots and light dusting from poor storage, no sweat, some time with steel wool will solve the problem. Wear gloves when you use steel wool; the threads break between the pressure of your fingers and the scraping of the pan, and some of the tiny broken threads can wedge into your fingertips. There might be stiff brass brushes at your hardware store that you could try using on the flat surfaces, but when I ve tried them the brass bristles bend more than they make the rust come off. Another way might be using a drill with a brush disc or a small grinding tool, but both are powerful enough to cause deep scratches in the iron. Having a pan sandblasted also causes scratches, too. I ve read that in cases of very old cast iron pans brought back to life through sandblasting, the scars on the finished pan kill its value to collectors.
If the rust is on the outside/underside of the pan, and not on the cooking or interior surface, and you ve found it will take more than 45 minutes to get it off, there might still be hope. My mom has a very nice aebleskiver pan hanging in her kitchen. (Aebleskivers are fantastic globe-shaped Danish breakfast pancake pastries. You can find brand new pans to make them with just a bit of hunting.) The cooking surface was fine, but the outside of the pan was coated with a thick, even layer of rust. No rust chips or caking, just a thick red crust. Feeling generous, I offered to steel-wool the rust and season the bottom of the pan. I worked with the steel wool for about a half hour, getting bits of broken steel wool strands all over the newspaper I d laid out to do the messy job on. Every five minutes I d rinse the pan off in the sink, dislodging the rust powder and steel wool bits from it, but it was clear I was making no progress. If I got anything off it was about the size of a nickel. A waste of time.
Fortunately all was not lost. I dried the pan and covered the rusty bottom with oil, same way you d season the cooking side, and put the pan in the oven. Can t get the rust off? Hell, cover it with oil and bake the oil in. It worked really well. The oil seasoned the bottom of the pan, so the rust turned black like the top of the pan, and the oil sealed the microscopic crevasses of the rust so that moisture wouldn t get in and cause more rusting. Best of all, appearances could not have been better. The rust was hidden and the pan bottom was protected. I fooled my mom into thinking I had gotten all the rust off with only a half hour of work. And it looked good too. Too bad this only works if the rust is on the outside, however. You can t cook on it.
Know Your Gear
There are two main American-made brands of cast iron cookware: Wagner and Lodge. Each can work well, but over years I ve found that Lodge pans are better to cook in, have thicker metal, hold a seasoning better, and hold their shape better. It isn t a pleasure to appear to endorse a product, but I d be selling readers short if I wasn t honest. I ve been through a dozen-plus pans over the years, and I ve always been happiest with Lodge.
If you want a smaller skillet--eight inches or smaller in diameter--have in mind what you ll be cooking in it. I find these sizes too small for most anything, unless it is a half a diced onion or something like that. As the diameter gets smaller, the sides get lower, and if you get slightly too much food into the pan and stir, the stovetop gets messier. The best use of these small skillets is for toasting spices, i.e., not a daily, or monthly, or even seasonal activity, for most of us. Beyond that they are good for very little other than uniform-sized crepe-making.
The high-sided pans are great favorites of mine, as is the slope sided Lodge omelet pan. Big, round, single-burner griddles are priceless for pancakes, tortillas and quesadillas. I hunted down a new two-quart cast iron saucepan once, for the principle of cast iron righteousness, I guess, but usually saucepans are used for cooking liquids and when I did that I found that boiling liquids help remove seasoning from the sides and bottom of the pan, and sticking problems resulted on the next use. This saucepan would be fantastic for deep-frying, but deep-frying is such a bother. Now I use the saucepan as a high-sided small skillet to re-heat leftover veggies. It is great in this role. I also use Lodge and Wagner chicken fryer pans for potatoes and stir-fries all the time.
If, however, you re going to start out with one only, and want the one that will meet the most needs, get a 10-inch standard frying pan. This is the pan that is the archetype of skillets, the one cartoon characters are drawn using on each other s heads or to stun rodents. The sides of these are high enough to stir a medium sized stir fry, yet low enough to get a spatula into and then under pancakes. The bottom is large enough to heat evenly, so, unlike a larger size pan, the outer inch or inch-and-a-half isn t at a slightly lower temperature. Should you toast spices or nuts in it, it will work fine too, and when you cook an omelet, it won t slip out smoothly, but the upright side won t be an impossible ridge to get over.
One traditional cast iron pan you shouldn t pick up is the Dutch oven. This usually comes with a cast iron or glass lid, and has a thick bar in a half circle over the middle for a handle that can be rested on the pan s side. One is inclined to make soups in these pots, and thus invite the problem of removing the seasoning by boiling liquid in it, as described above. If you ve got something else in mind for cooking in these, an oven roast, say, have at it, but you ll be better off if you have a glass cover for your Dutch oven. The cast iron lids are just plain hell. They need to be seasoned against rust just like the pans, and when they re used in cooking the steam caught inside sweats out the seasoning on the lid s bottom. I ve lifted the heavy lid off and seen a pale sheen of rust seemingly form right away as the steam moisture dried on the hot lid s underside. A glass lid doesn t need seasoning, but generally, or as a first pan, don t bother with a Dutch oven because it needs re-seasoning after fewer uses, if not after every use.
If you have a couple of pans, we ll season them all in the oven at once in the next column. But either way--one pan or many--cast iron is cheap and more satisfying to use than pans that cost hundreds of dollars more. Once tamed with seasoning and the vibrancy of use, they re easier to cook in, better to cook in, easier to clean, and just plain beautiful to have sitting or sputtering on one or several stove burners.
Working with cast iron is exactly that: working with your pan. Seasoning and cooking in the pan will tell you things about using it, and once that language, spoken through oil spots on a seasoned pan, oil streaks on a hot one, stuck food spots on a just-used one, can be understood, a higher form of dialogue will come into play. The more the pan communicates with you, and the more that reinforces how you cook, the more tame the pan will be.
Taming the Cast Iron Beast -- seasoning
The drawback to cast iron pans is this thing called seasoning. What the hell is that? For cast iron purposes this means protecting the metal by covering the tiny pores of its surface with a cooking oil and baking it into every minute surface of the pan and affixing it there with heat.
Sounds simple, but there are plenty of unknowns about what makes a pan seasoned.
For example, with use and seasoning, a cast iron pan turns a beautifully dark, velvety black color. But this color alone doesn t mean that an old black pan you pick up used or from family is currently seasoned. Indeed, an old and very black pan might be very unseasoned and thus might be absolutely rotten to cook in. A brand new pan isn t seasoned either, but when it s seasoned for the first time it becomes a sort of greenish brown/black color. Even though it s not black yet it can be a vastly superior cooking vessel than the unseasoned old black pan.
So first, the upshot, if you ll allow the literary device of anthropomorphizing your cast iron pan, is that seasoning is not the pan s definitive state of being, it s the pan s current state of mind. Seasoning is something you can t see, it s something you build and then maintain.
Second, there are unfortunately other unknowns about seasoning. Like exactly why it works. Examine Harold McGee s On Food and Cooking: The Science and Lore of the Kitchen, the famous and foremost tome on the science of cooking. Here s how it explains the chemical reaction behind seasoning s success:
"The oil penetrates into the pores and fissures of the metal, sealing it from the attack of air and water. There may also be an effect analogous to the behavior of the drying oils, which are largely unsaturated, prone to oxidation, and which polymerize to form a dry, hard layer when exposed to air. Since both heat and metallic ions accelerate fat oxidation, it may be that a similar layer is produced during seasoning with cooking oils. To avoid removing the protective oil layer, users of cast iron clean their pans with mild soaps and an abrasive like salt, rather than with detergents and scouring pads. [Emphasis added.]"
You can get someone in a lab coat to tell you about seasoning, but you still get maybes. Further, you can get famous chef authors, each with a couple of career decades behind them, whose directions differ on fundamental seasoning points. About soap and salt on the pans, for example, the great chef Madeleine Kamman, to clean her cast iron pans after use heats 3 tablespoons of oil in them, swirls it around, pours in 2 tablespoons of kosher salt, scrubs that around to get any cooked-on food off, and dumps it. Then, she stores pan, and wipes it with fresh oil when she uses it next. So she cleans with salt, not soap.
What a contrast to directions from Howard Hillman, author of over 25 cookbooks according to the blurb on the back of his Kitchen Science (revised edition), A Guide to Knowing the Hows and Whys for Fun and Success in the Kitchen. He cleans a just-used pan with a little soapy water, but no scrubbing with salt: that technique can also chemically precipitate rusting, he says. Exactly the opposite of Kamman.
Cut through the muck
So the professionals disagree. Beyond that, there are a lot of other old-wives-tales about cast iron to cut through. From so many mouths I ve heard how easy it is to season and work with cast iron. Just rub the oil on it and put it in the oven for an hour, some say. Some say the oven should be at 300 degrees Fahrenheit, but I ve also heard 500 degrees is the right temperature. Some say one must put the pan upside down in the oven. Some don t bother to say.
As a general rule though, the people who say cast iron pans are simple are the people who haven t worked with the things themselves. Start following those it s easy! directions and the process should raise dozens of questions: What s with these oil spots? What s with this sticky, brown, burnt-on oil? The directions say wipe out excess oil at the end, but all the oil is stuck on and the threads of paper towels stick in it instead of wiping anything out! The directions say I have to leave the pan in the oven to cool off after the hour of seasoning doesn t that give the sticky oil a chance to harden? Did I put too much oil on? Did I use the wrong oil? Did I have to warm the oil before putting it on the pan? My new pan isn t black after I followed the directions is it still seasoned?
Since there are competing old-wives-tales and rival advice from professionals, and it seems there s a never-ending maze of seasoning might-have-beens, we offer the following as a pan-seasoning educational primer.
Seasoning steps
The Wagner Manufacturing Company s pans now have seasoning directions printed on the bottom. They pretend to be easy:
The truth of the matter is that a pan should indeed be cleaned before seasoning. A new pan comes with a light coat of a food grade sealant covering it so that it doesn t rust during the process of shipping or display. Wash it by hand like any other pan hot water, standard dish detergent, a hot water rinse, and dry it immediately.
When I got my first cast iron skillet my mom told me I had to scrub off this layer with steel wool, rinse the pan, dry it, and then wipe it with a paper towel dabbed with cooking oil. If the paper towel developed a dirty steel colored spot where I d been rubbing it, she explained, it meant there was still some of the sealant on the pan and I d have to repeat the steel wool scrubbing process again to get all of the sealant off. Or the pan wouldn t season in the oven, or it would be unhealthy to eat from, or some other kind of pan disaster. I ve come to think that the dirty steel color was the residue of the steel wool that I d used in the first place, but either way, the cast iron pans now available don t need this level of scrubbing when you first get them home. A standard dish washing with prompt drying is all you need to get ready to slather the pan with seasoning oil. That s what Wagner s direction of scour thoroughly means.
There are different schools of thought about what coat with cooking oil means. Sometimes it s standard vegetable oil. Sometimes it s shortening. Sometimes it s lard or bacon grease. Sometimes, the word is, you ve got to warm the oil first before spreading it on the pan. Most of this is useless fussiness. All of the above will work and ultimately give you a great pan. There are two oils that should be avoided however: olive oil and butter. Olive oil burns at a much lower temperature than vegetable oil or shortening, and butter breaks down into fats and milk solids when it is heated, and the solids burn.
Here s a secret behind the rival oiling methods: The more you work with your pan you ll find that the habits you develop regarding oils become the deciding factors in what seasoning methods you think are best. Truth is pretty much any oil can be used and will give a good seasoning, but predictability, custom, and minimizing of variables will make you find an oil you decide is best.
The sad fact is that there is a lot of bad advice regarding which oils to use, and lots of that bad advice is dressed up in scientific language and health cautions. You can read that saturated fats (solids like shortening) are the only oils to use, supposedly because unsaturated fats, which are liquid, can go rancid and adversely affect the health and taste qualities of food cooked in the pan. Further, you might read that that solid fats mean the seasoning lasts longer. (Not a fact I ve necessarily observed). So it is easy to dress up your habitual oil choice to be the must-use.
For my seasoning, what I have become accustomed to and thus prefer using is vegetable shortening. Lodge Manufacturing Company s web page on seasoning says that the shortening should be melted before applying it to the pan. That s probably too much effort. I like spreading the shortening on in its semi-thick state, still trying to smear it thinly but leaving its gooey, sticky, slippery qualities in some places. Some people warm the pan slightly before smearing on the shortening the warmth of the pan helps to melt and spread the oil. Whatever you do, smear all surfaces of the pan. Cooking side, outside, bottom, and handle.
Side note: I ve used liquid oils like canola oil as well and been perfectly satisfied. Do they turn rancid on my pans? I ve been seasoning pans for two decades and never has there been anything rancid about any pan I ve seasoned with any kind of oil. Rust sneaks in when the pans aren t stored right and are unused, but never has any rancidness appeared, much less made a pan go off , or made my food taste bad. I m not a scientist or a health inspector, but my experience is that rancidness worries are complete bunk.
Wagner says heat the oven to 300 F and Lodge says heat to 350 F. I say there s not that much difference there pick 325 F if you want, it s a pretty number.
Seasoning is easy! exclaimed someone to whom I mentioned this column at a keg party. Just heat the oven to 500 F! She hadn t ever seasoned a pan, she said, but added that someone in her family had, and that s where the 500 F temperature recommendation comes from. I d strongly advise you not to try the 500 F method. I think that would risk burning a lot of the oil onto your pan and smoking up your kitchen with an awful smell. But I haven t tried it; the risks make it not an easy seasoning method for me. Three-hundred degrees Fahrenheit to 375 F will work fine; no need to get hung up on the temperature range. Still, if it s too hot, say upwards of 400 degrees, you ll have oil burn faster, which, in turn, will make your kitchen stink more. The general rule I ve observed is that the higher the temperature you use, the more involved and active you need to be with the coming steps, and the less time you have to do them. Be aware of that don t think later that if had only used the different temperature, that your seasoning job would have come out better.
Lodge recommends putting a piece of aluminum foil on the oven rack so that oil that drips from your pan doesn t leave the floor of your oven nasty. That s a good idea. Lodge also recommends putting the oiled pan on the rack upside-down, presumably so that oil drips from the sides don t slip into the reservoir that is the cooking surface, and smoke & burn there. But in the accompanying illustration Lodge shows the pan placed right-side up on the rack. So which way should it go? Truth is this upside-down thing is really a useless direction. It seems to have an advantage if you don t want to do some steps I m going to suggest, but otherwise the seasoning qualities won t be affected whether your pan s top is up or down. I ve done it both ways with the same result.
Into the Fire
Upside down or right side up, put your pan in the heated oven. Bear in mind that, depending on how much oil is on the pans and how hot your oven is, you might get the smell of burning oil in your kitchen, maybe even some smoke in the oven. That s normal and it s no big deal.
What s essential is what you do next with what s on the pans, and here s the first of my personal touches to cast iron seasoning success: set a timer for twenty minutes when you put the pans into the heat. What happens when the oil-coated pan is heated is that the oil gets hot and starts to run. Similar to oil heated in a pan on a burner, the oil thins out and moves faster as you tip the pan, almost as thin as water. As that happens in the heat inside your oven, the oil separates, gets runny, and the oil on the edges flows down to the bottom of the pan, or to the lip of it, if your pan is upside-down. Take your pan out once it has reached the temperature in the oven and you ll see the oil separates into rivulets, and on the flat, inside surface of the bottom of the pan, the rivulets separate to form a spider web-like pattern. If the pan has gotten hotter, or been in the oven for a longer time, the rivulets will separate further, breaking themselves into little dots or small blobs of oil. At higher temperatures, those blobs will burn onto the pan. At still higher temperatures, the rivulets will burn onto the pan because the temperature is so hot they burn on before they separate into the dots or blobs.
If your pan was coated in a lot of oil, the blobs will be bigger. If only a thin layer, the blobs will be dots the size of kosher salt grains. I read a great description of these blobs in a cookbook by a guy who s regularly on cable television s Food Channel. He said these blobs of oil, when the pan cools, become harder than plastic. That s exactly right. And once the pan is cool, you can t get them off with a paper towel, or even the scrape of a metal spatula. They re also sticky, and food adheres to them when you try to cook in the pan. They are not the strong sealant and non-stick coating you want to bring to your pan through seasoning. A well-seasoned pan should be smooth when you take it out, and it should have a matte surface reflection, not glossy or even semi-gloss. At the end it should look dry, and reflect one consistent dull sheen of light.
For the purposes of this column I baked a griddle so that it would develop these plastic-like blobs. It was still possible to use it later for easy stuff like quesadillas/tortillas, pancakes, and grilled cheese sandwiches. Further, once the griddle got hot the plastic blobs got looser and I could scrape them off, but they didn t come all the way off..
These baked on blobs are the crux of seasoning problems. They re also the reason people who say seasoning is easy are liars. The easiest way to get rid of these blobs is to prevent them. When you put the pan into the oven, set a timer for twenty minutes. When the timer goes off the pan should be hot and the oil will have started to separate. Use an oven mitt with a paper towel between it and the hot pan and pull the pan out of the oven. Now, with another paper towel folded in another oven mitt on your other hand, wipe those hot oil blobs all around like you re spreading it on all over again. Since the oil rivulets or blobs are hot they won t be sticky and you ll easily be able to spread them all around the pan. Wipe hard around all surfaces and make sure all the oil is a smooth, even, shiny, oily coating, inside, outside, and handle. Put the pan back in the hot oven. Set the timer for another twenty minutes. Repeat process.
This may be a bit labor intensive and another reason why people who say seasoning is easy are liars. But this process consistently takes care of even distribution of the seasoning oil while preventing burning and messy cleanup. It also removes the worry of initially applying too much oil, and it means it doesn t matter if the pan is upside down or right side up in the oven. Lastly it isn t anything tough to do. After two wipe-outs of the hot pan you can relax with it in the oven. An hour total in the hot oven is fine for a seasoning, but check it out while it is still hot in case it needs another wipe out before it cools.
You can even prolong and I suspect improve your pan s seasoning by reapplying more fresh oil after the first hour and continue baking it with 20-minute interval wipe outs. There are times I ve wiped-out five or six pans seasoning together after an hour and then forgotten them baking in there for another couple hours. No harm done.
Out of the Fire
Sometimes however, even a dry and matte pan left a long time in the oven, especially at a higher temperature, will still break out in tiny black oil pimple dots, spread over the surface with the evenness of a loose screen. You ll get a similar problem if they haven t solidified into hard dots yet, when, if you pull the pan out, try to wipe or rub off the dots, you find them very sticky. They turn into a very brown smudge, sticking to the fibers of your paper towel. This smudge is so thick you ll barely be able to wipe any distance. For me both of these overcooked oil disasters were despair territory; all my previous seasoning work wasted since now I d have to steel-wool off the damned bumps or the brown tar-like sludge.
But there s an easy way around the problem, and this is something you won t read on the back of every pan. Put some fresh oil onto a clean paper towel, or pour it directly into the hot pan, and wipe it around, spreading it over and through the bumps or sludge. If the pan is still straight from the oven hot, the fresh oil does removes the problem and re-establishes the smooth metal sheen that you need to cook on. Whatever you do, don t let the dots or sludge dry. And the pan must be hot. Always take it out and wipe all around it with a paper towel in the oven mitt, just to see if there are any hidden burnt/sticky spots. If there are none, or once you correct any, put the pan back in the oven.
What to do with the pan when the oven heating period is over seems to be important. Many directions declare that you should turn off the oven and leave the hot pan inside it to cool before removing it. Often it sounds like this slow cooling is part of the seasoning process. It isn t. A few years ago I called Lodge to verify this. A woman at the other end of the line explained this was because older, and thus weaker, people would have a hard time handling the heavy pan, which would then be dangerously hot, and so the let cool in oven direction was to prevent injury and has nothing to do with the theory or practice of seasoning your cooking vessel.
But the lesson is a good one. Pan. Hot. Don t. Be. Stupid.
Once you pull the pan out, its surface should be dry with a smooth, even, matte sheen on it. You should be able to run a fingernail across the cooking surface and have it come off clean no black crust should come up in the form of gritty little sand pebbles. You ll know this good result when you get it, but if you get some crust still on the pan don t worry about it, a bit of use will carry off these spots.
A Rival Method
In its May/June 1997 issue Cook s Illustrated magazine tested a rival method of seasoning cast iron pans, and it s a good one worth mentioning here, although I ve quit using it myself. Using seasoning techniques for a wok outlined in Barbara Troop s The Modern Art of Chinese Cooking, Cook s Illustrated writer S.L. seasoned a frying pan over a hot burner on the stove top instead of in the oven. Here s how it goes:
I ve used this method several times and I ve liked it less each time. The pan is very hot, the hot oil can splash around and onto me, the burning oil smokes like crazy, and the oiled paper towels burn where they rub on the pan and then they flake apart in burned bits. It also has to be done fast and is tense.
Of course one doesn t use a bare hand for this process with the clump of oiled paper towels. You ve got to wear an oven mitt. Once I tried rubbing the oiled paper towels around with a pair of kitchen tongs instead of my hand but that didn t work well you really need the blunt instrument of your fingers inside the mitt to rub well and rub hard.
Cook s Illustrated preferred this method to the oven method, which it called lengthy and still left gunk in the pan. (Obviously they didn t add the 20-minute wipe-out technique.) The rival method was brilliantly simple and quick and left the pan smooth and glossy.
While it does give a good cooking surface this method fails for me because it doesn t season the handle or outside of the pan. These need the seasoning to keep moisture out of them. Also this method works one pan at a time. As I ve built up my collection of cast iron, I season up to five pans in the oven at once. The Cook s Illustrated method is great however for a quick seasoning on a pan that s half seasoned, say, and needs a topping off or to be prepared for effective use right away.
I once decided that I d season three new pans using both methods, and a lot of each: three seasonings in a row in the oven, followed by three seasonings in a row using the stovetop method (with a cool down between each seasoning). It was less work than it sounds, and man alive the results were good food slipped around and off them like weapons bounce off the black armor of evil knights in fairy tales.
Bake the colors
People often think that having a black-colored cast iron pan means having a seasoned one, or that their new pan isn t seasoned until it s black. One set of directions even said, erroneously, that if the pan didn t come out of the oven blackened, it wasn t properly seasoned. For others, the pan isn t worthy of oven-to-table serving dish credibility until it s black.
I once worked in a cooks tools and kitchen supply store. A television commercial production company s prop specialist came in and wanted a bunch of cast iron pans for some commercial about how down-home a roadside chain restaurant s food was, or something, and the prop specialist was severely bummed that the cast iron wasn t already black. After all, to show off how down-home the chain was, they needed down-home, old lookin , and therefore seasoned by years of use looking pans, right? What do I have to do to make them look old, loved, and used? The prop gatherer asked me, and her eyes got bigger when I explained that initially the seasoning process would only give an ashy-greenish-brown color, before eventually, with further seasoning, bring out the deep-black end result.
She had to take this information back to the office.
Your new and newly seasoned pan doesn t need to look black. Food will cook fine in it no matter what the color if the directions above are followed. It might not have a perfect stick-free surface yet, but cooking the right way with it, as we ll discuss in part three of this column, and further seasonings in a few months or so, will only make it better and better. You ll be able to watch the color darken even as you use your new pan on the stove top. The best part is that the darkness spreads; at first it s a round black dot at the center of the pan where it rests on the heating element. Then with more use the dot gets bigger, gradually reaching the base of the sides of the pan. If you usually cook with butter in your new pan the non-black edges will be a brownish color, if you use olive oil you ll have a heavier greenish tinge. Either way, these color variations are temporary and will be with your pan only for a few months of use.
The television commercial company ended up spray-painting their cast iron pans with semi-gloss black paint. Then they simmered some vegetable soup and other roadside delights in them for the filming.
But the truth is that the all-black sheen color is very cool, and does indeed show cast iron prowess and savvy on your part. I ve discovered a trick to getting a black pan faster, even.
Storing all this heavy armor is an extreme bother, so I ended up stuffing 4 or 5 pans onto the lower shelf of my oven. Then I forgot they were there. Then for weeks I used the top oven shelf for normal frozen pizza baking, potato baking, and pancake warming duties. That meant each time I heated the oven for a small chunk of time the forgotten pans got hot and lingered in the heat. When I took them out to use one of them a month or two later, even the new ones among them were completely black, as if I d been using them for at least a few years. They were not as protected against sticking as pans that had been used for a few years, but oh man, they looked the part. TV commercial ready, even.
When I first left them in the oven they were already seasoned and had the proper dry, non-oily sheen. I didn t wipe them with oil during their oven storage period either, although a very thin coating might have been a good idea (but might have caused the baked-on-plastic-dots problem if I d made a really hot oven for something). The lesson: store your cast iron pans on the oven s lower shelf while not in use. Saves space in the rest of the kitchen and does right by the pans too.
Looks or not, seasoned cast iron pans are a joy to cook with beyond joys of any other pan high grade stainless steel pans are suburban and boring, not to mention less sturdy.
A friend of mine who studied in a French culinary school came over to help make a huge roadside-restaurant-style breakfast at my house one weekend morning. Omelets, home fries, pancakes, veggie sausage. Each stovetop burner was hot with a different cast iron pan on it. I really like your pans, he said, stirring and flipping things in each pan with wooden utensils, nothing sticks to them.
Chris Peterson is a vegetarian and freelance writer in Washington, DC.
2 tbspns, cheese powder
Add pasta, reduce to simmer for approximately 20 minutes
Cook until pasta is tender and milk has thickened (you may need to add more)
Toss cheese with cornstarch
Stir in mustard and hot sauce
Stir in cheese, handful by handful, letting each one melt completely before adding the next handful
Enjoy
- enough sour cream to make it look like tuna salad
- one-half the grated cheese
- garlic powder, pepper, powdered mustard, and oregano to taste
Put butter into a Dutch Oven on stovetop burner.
While butter melts prep ingredients and add to the pot.
Cover and place pot in oven
Bake for 45 minutes to 1 hour, or until potatoes are soft and tender.
Serve with a green vegetable.
Berry Cobbler-Cake
Berry Cake Pie
Melt butter in frying pan. Add a splash of white wine.
Rub fish with mix made from remaining ingredients
Once butter is melted, turn pan to HI. When butter-wine mix begins to boil, add fish to pan.
After one minute pour off excess liquid and set aside for later.
1-2 minutes later (when bottom of fish is browned), turn over fish and pour butter-wine liquid over fish.
Cook an additional 2-3 minutes until fish is done.
Put chocolate chips, condensed milk and butter in a sauce pan and melt together.
Mix in peanuts and mini-marshmallows.
Put mixture in greased pan and let cool.
I sometimes add a little vanilla. Either way its easy and good.
Carrot Cake
Add eggs to while mixing, one at a time.
Add carrots and vanilla.
Bake for 60 minutes in a 350-degree oven.
If mixture is too thick to spread, add a small amount of milk
Cheese Sauce
Oil the sides and bottom of a 3-quart oven-proof glass or enamel casserole.
Thinly slice, quarter, and saute onion in olive oil until carmelized.
Dice potatoes and place one-half of the potatoes in the buttered casserole
Add one-half of the onions.
Add all the mushrooms.
Salt & pepper to taste and dot generously with the butter.
If using fish, wash the fish and cut into bite-sized pieces, feeling carefully to remove all bones
Make the next layer using all the fish, clam, or mussels, including fluids if using canned produts.
Spread garlic over fish, to taste.
Add the remainder of the potatoes, top with the rest of the onions and use up the rest of the butter.
Pour in the half and half. Add water or milk, as needed to cover all the ingredients.
Sprinkle heavily with paprika.
Place the casserole, covered, in the preheated oven and bake for about 75 minutes.
The top by then should be a lovely golden brown, due to the paprika.
Serve at once, accompanied by the heated crackers or other hot bread.
1 can celery condensed soup
1 large can whole clams (juice too!) or other seafood
1 diced potato
1 cup or more of corn (frozen or otherwise)
1 can mushrooms
Milk
Saute garlic and onions over high heat until well burnt.
Microwave potato to the point where it can still be cut & diced.
Combine ingredients in oven-proof pot and add enough milk to cover everything
Bake in oven until warm throughout.
Heat butter and oil in a large Dutch Oven over medium heat.
Add leek, celery, and bell pepper;
Cook until tender.
Combine milk and flour in a small bowl, stirring with whisk.
Add milk mixture to dutch oven.
Pour 1-1/2 cups of chicken broth into milk & flour bowl and set aside.
Stir in remainder of broth, corn, potato, salt and ground pepper.
Bring to boil on medium heat.
Simmer for 20 minutes or until potato is tender.
Stir in parsley and chives.
source: Cooking Light August 2006
Ingredients
Soak unhusked corn in cold water for at least 1 hour.
Grill unhusked corn over high heat, turning occasionally, for about 8 minutes, or until tender.
Lime and Red Chile Topping:
Squeeze fresh lime juice over hot corn,
sprinkle with red chile powder and black
pepper. A very Mexican way to enjoy corn
on the cob!
Garlic-Lemon Vinaigrette:
In a small bowl, mix together 1 ½ tbsp. of
olive oil, 2 tbsp. of fresh lemon juice and 2
cloves of minced garlic. Brush onto hot cobs
of corn with a pastry brush.
source: http://www.firegirl.com/cooking/sizzle5.html
Melt butter in a large saucepan over medium-high heat.
Add leeks and celery; cook, stirring occasionally, until softened, 6 to 8 minutes.
Add garlic; cook, stirring constantly, until fragrant, about 1 minute.
Stir in thyme and salt. Puree the soup with an immersion blender until smooth, about 2 minutes.
Add half-and-half and process just until incorporated, about 15 seconds. Serve immediately, topped with chives.
Wet toasted muffins with sauce, cover with meat and egg, pour remainder of sauce over the whole stack
ACTIVE TIME: 20 minutes
TOTAL TIME: 45 minutes
General Tso's Chicken
Grilled Crab or Shrimp Sandwich
Build sandwiches using an obscene amount of crab meat or shrimp.
Salt and pepper to taste.
Oil bottom of pan, lay in sandwiches, and spray or butter the top of the sandwiches.
Cover, press down and bake for 10 minutes.
Remove cover, turn on broiler, broil for 1-2 minutes until browned.
Turn sandwiches, broil for 1 minute until browned.
turning them several times to make sure they are well coated.
Set aside at room temperature for 30 minutes.
After 15 minutes, build a charcoal fire or preheat a gas grill to medium-high.
Rinse the squash, then cut off the ends and slice them in half lengthwise. Set aside.
When the grill is hot, place the chops on the grill and add the squash to the bowl, tossing it around in
the marinade.
Cook the chops for 7 minutes on the first side, then turn them.
Add the squash to the grill with the chops and spoon the marinade that remains in the bowl onto the chops. Grill the squash for 3 minutes on the first side, then turn it over.
After another 3 minutes, remove both the squash and chops to plates and serve immediately with coleslaw.
source: http://southernfood.about.com/library/print99/p90814e.htm
source: The New Southern Cook - John Martin Taylor
You will need:
1. Pour off a glass or so worth of apple juice and set it aside (you'll need some of it in a bit).
2. Put the sugar into a saucepan. More sugar means a sweeter cider, and more alcohol, darker sugar means a darker cider with a stronger flavor. I like about 4.5 cups, half dark-brown and half white sugar.
3. Add enough apple juice to the saucepan to dissolve the sugar over low heat. You shouldn't need more than half of the remaining cider.
4. Once the sugar is dissolved, let the mixture cool slightly, and pour it back into the bottle (use a funnel if you need to). The bottle should now be full of warm extra-sweet juice.
5. Toss in about 1/2 tsp of yeast (a yeast packet usually holds a little over 2 tsp, so don't throw the whole thing in), and top off the bottle with the juice you set aside in step 1. Leave a few inches at the top of the bottle -- don't let it get too full.
6. Wash the powdered anti-stick stuff out of the balloon, and prick it with a pin. Then place the balloon on top of the bottle. The pinprick will be enough to let air escape from the bottle, but not big enough to let any nasty bacteria back in.
7. That's it! Let this sit for 2-3 weeks.
After 2-3 weeks, you will need to "rack" the cider. Racking is the process of siphoning the cider off the top of the lees (dead yeast). You can use a siphon if you want, but if you're careful, the 1-gallon bottle is small enough that you can usually just pour the good stuff off the top. Don't worry if you get a little lees along with the cider, since you have to rack it again, anyway. Replace the balloon (using a new one if necessary) and let the cider continue to ferment.
Rack the cider again every 2-3 weeks until there is no more lees at the bottom of the bottle. The cider is drinkable at any stage, but it starts to get good at about 2-3 months, and excellent around 9 months (and so far, I've only seen it get better with age).
* Please make sure that you do not reseal the juice bottle with its original lid until you are completely sure that there is no live yeast left. This kind of bottle was not made to handle pressure, and if you have any live yeast left over, you risk building up more pressure than the bottle can handle. Since the cap screws on stronger than the glass can hold, if it blows, you'll end up with sticky broken glass all over your kitchen (or wherever you chose to set your brew). Trust me, you don't want that.
Hot Buttered Rum
Ice Cream
Fill cylinder of ice cream maker no more than two-thirds full; churn for 30 minutes or until mixture stiffens; freeze according to manufacturer's directions. (Refrigerate any remaining mixture until ready to freeze.)
Serve immediately or store in covered containers in freezer.
If not churning in an ice cream maker, whip with electric mixer every 30 minutes until done, approximately 3 hours.
1. Preheat oven to 350°F. Coat a 9-by-13-inch glass baking dish with cooking spray. Put a large pot of water on to boil.
2. Cook noodles in the boiling water until not quite al dente, about 2 minutes less than the package directions. Drain; return the noodles to the pot, cover with cool water and set aside.
3. Coat a large nonstick skillet with cooking spray and heat over medium-high heat. Add sausage and cook, crumbling with a wooden spoon, until browned, about 4 minutes. Add mushrooms and water; cook, stirring occasionally and crumbling the sausage more, until the sausage is cooked through, the water has evaporated and the mushrooms are tender, 8 to 10 minutes. Squeeze spinach to remove excess water, then stir into the pan; remove from heat.
4. Mix tomatoes with basil, salt and pepper in a medium bowl; in a separate bowl blend egg with ricotta cheese.
5. To assemble lasagna: Spread 1/2 cup of the tomatoes in the prepared baking dish. Arrange a layer of noodles on top, trimming to fit if necessary. Evenly dollop half the ricotta over the noodles. Top with half the sausage mixture, one-third of the remaining tomatoes and one-third of the mozzarella. Continue with another layer of noodles, the remaining ricotta, the remaining sausage, half the remaining tomatoes and half the remaining mozzarella. Top with a third layer of noodles and the remaining tomatoes.
6. Cover the lasagna with foil and bake until bubbling and heated through, 1 hour to 1 hour 10 minutes. Remove the foil and sprinkle the remaining mozzarella on the lasagna. Return to the oven and bake until the cheese is just melted but not browned, 8 to 10 minutes. Let rest for 10 minutes before serving.
Per serving: 316 calories; 13 g fat (6 g sat, 2 g mono); 59 mg cholesterol; 28 g carbohydrate; 26 g protein; 6 g fiber; 681 mg sodium.
Nutrition bonus: Vitamin A (90% daily value), Calcium (35% dv), Folate (15% dv).
1 1/2 Carbohydrate Servings
Ingredient note: Whole-wheat lasagna noodles are higher in fiber than white noodles. They can be found in health-food stores and some large supermarkets. Variation: For vegetarians, use a sausage-style soy product, such as Gimme Lean, or simply omit the sausage altogether.
To make ahead: Prepare through Step 5 up to 1 day ahead.
source: Eating Well Magazine
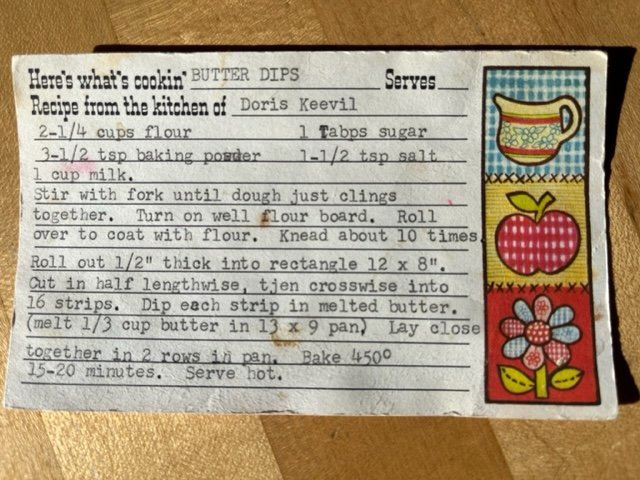
Dissolve 1 pkg lemon jello (not pudding) in 2/3 cup boiling water.
Add 3/4 cup salad oil and 4 whole eggs. Mix,
Add l package of lemon cake mix.
Beat until it looks like mayonaise, then
Pour into angel food pan, well greased.
Bake 1 hour at 350 degrees.
While baking prepare glaze:
1-1/2 cup conf. sugar mixed with
6 Tablespoons lemon juice.
Remove hot cake from pan immediately.
Pierce with fork and cover with glaze.
Continue piercing so glaze will go down inside cake.
Keep in refrigerator.
source: Doris Keevil
Place chops in frying pan
Add spoiled hard cider or alternative (approx. 1/2-inch deep)
Bring to a boil
Cover top of chops with sauce
Simmer at near-boil for 1 hour, or more
1. Combine ingredients. (I like to crush just a little with a mortar and pestle.)
2. Store in air tight container.
3. Use in any recipe calling for Montreal Seasoning or rub on steaks, pork chops, burgers, chicken.....etc.
A delicious blend combining the best of Lentil and French Onion soups.
1. Add the olive oil to a soup pot, turn heat to high.
2. Dice the onions and add to the pot hot oil in the pot.
3. Reduce heat to medium after a few minutes. Sautee, remembering to stir frequently
4. Place lentils in another pot, add water, bring to a boil; then reduce heat to a simmer
5. Cover both pots and allow to simmer away for approximately 60-minutes (you may need to add more water to the lentils)
6. Stir lentils into the reduced onions in the soup pot and continue to simmer.
7. Add liquids, tomatoes, bay leaf, carrots, and jalapeno slices.
8. Add salt, cumin, oregano, and coriander to taste.
9. Continue to cook for at least 30-minutes, adding additional liquids as necessary to maintain desired consistency.
10. Serve with fresh French bread and butter.
Variation: omit Lentils and carrots for a dynamite stovetop French Onion Soup.
If making your own, mix 2 parts tomato paste, 1 part ketchup, and a splash of vinegar or wine for a dry sauce, or replace tomato paste with tomato sauce, or even diced tomatoes for a wetter sauce (or Mexican salsa, or ???).
You will only need about one cup or less per pizza. But whatever route you choose, be sure to enhance the sauce with generous quantities of:
*Basil, *Oregano, *Garlic, and a splash of *pepperochini juice for added pizzaz
Bake an additional 15 minutes, uncovered.
A great use for leftover meats. Extremely tasty for meatloaf and dungeness crab
Sprinkle of layer of grated cheese over ketchup.
Lay down a slice of meat loaf on top of ketchup
Garnish with remaining vegetables
Top with additional cheese
Fold tortilla in half
Grill each side until tortilla is browned
Finish off in microwave
Big and juicy Texas style burgers
Dice mushrooms, bacon, and one-half of the onion.
Mix mushrooms, bacon, onion, garlic, beef, BBQ sauce, and other preferred seasonings.
Make 8 patties
Using a tablespoon, dimple each patty in the center (helps avoid shrinkage)
Liberally coat with BBQ sauce
Grill on a not-too-hot BBQ until desired doneness is achieved
Add sliced cheese when you flip them to the other side
Serve with your favorite hamburger condiments
Serves 8 -- and you're only going to want one!
Perfect, slow cooked salmon on stovetop. From "America's Test Kitchen TV Show"
Note: if pan is too hot you may need to use a spatula to keep salmon from burning/sticking
See also: Salmon, cold fried
To a hot pan set to Medium-High heat.
source: modified internet recipe
This is a useful dish for dinner parties because it can be prepared in advance and the size and quantity of prawns determines whether it is to be served as first or main course. It is served in individual oven-proof dishes, but an 8x8 baking dish also works.
Mix together the breadcrumbs, cheese, herbs, pepper and salt.
Dry the prawns.
Lightly oil the dishes and line the bottom with half the slices of zucchini
Cover this layer with half the breadcrumb mixture and arrange the prawns on top.
Lightly season the prawns with cayenne and then sprinkle half the remaining breadcrumb mix on top.
Dot with oil then cover with the remaining zucchini.
Make a final layer of breadcrumbs and dot with a few drops of oil.
Top with sliced tomatoes or other vegetable of contrasting color.
Sprinkle with more cheese.
Add a splash of white wine to each dish.
Cover each dish and cook in a pre-heated over (400-degrees) for 10 minutes. Allow additional time if frozen (5 - 8 minutes).
Avoid temptation to make in one larger pot, as breadcrumb mix on upper levels will remain dry and granular instead of moist and stuffing-like.
source: Top 100 Italian Dishes by Diane Seed (and modified)
Source: Brenda/Charleston
Mix thourougly with whisk, removing all lumps, add more soy sauce as necessary
PREP TIME: 15 minutes
MAKES: 4 to 6 servings
Over a large bowl, cut kernels off corn cobs.
Stir in tomatoes and onion.
Toss with vinegar and basil;
season with salt and pepper to taste.
NOTES: You can use basil flowers in this dish. Just pull the flowers from the stalks and sprinkle them like confetti into the salad in place of (or in addition to) the chopped basil. They add a light, floral note.
(source: Sunset Magazine, August 2006)
Alternative serving to serve more people
Cast Iron Cookware, Part 1
by Chris Peterson
Cooking with the best, and cheapest pans you ll ever love, Part two of three
Country Style Beef Ribs
This is a quick posting as I don't have much time to spare right now.
Country Style Beef or Pork Ribs are generally boneless and the tougher cut of meet. When braised in a sauce they become fork tender and meltingly delicious. We served it them with a wild rice blend and some corn.
1 package country style ribs (I used beef but pork works too)
1 bottle of your favorite bbq sauce
1/3 c ketchup
1-2 tsp hot sauce (siracha is good)
2 TBSP mustard or ground mustard
1 onion, roughly chopped
2-3 cloves of garlic
1 T soy sauce
1 T worchestershire sauce
1 t paprika
Simmer the ribs in the sauce and all of the ingredients for about half an hour. Add salt and pepper if you wish. Meanwhile, preheat oven to 350 and prepare a baking dish lined in two layers of foil. Place the ribs and sauce into the baking dish, cover with foil, and bake for about 1 and a half hours. Uncover and bake for an additional 45 minutes. Let cool and serve.
This does take a while but it's really delicious. And one day, I'll not be lazy and make my own bbq sauce. Use the above ingredients in greater quantities (minus the bottled sauce of course) and add canned tomatoes, molasses, and brown sugar. Plus any other spices you deem necessary. A jalepeno would also work.